


Reflow Soldering Profile for Solder Paste
Author Dmitrii KhramtsovPosted 30 April 2025
Updated 30 April 2025

Why the Reflow Profile Matters in Soldering Electronics?
Have you ever wondered why some PCBs work flawlessly for years, while others fail within just a few months?
Soldering reliability depends on many factors — from flux quality to heating time. But one of the most common and underestimated causes of hidden defects is an incorrect reflow profile. In this article I’ll show and explain how to properly configure all reflow zones, timings, and meaning. This information is useful both for beginners and for those with years of experience.
I will go over the reflow temperatures of both leaded and lead-free solder pastes. You’ll learn what happens in each zone of the reflow oven and how to build a correct soldering profile for Electronics PCBs.
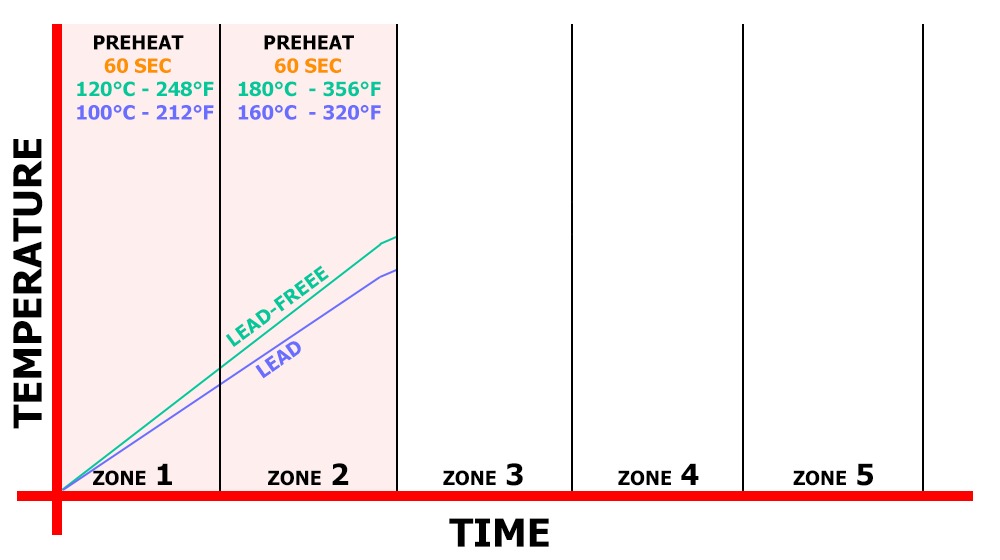
Preheat Zones – Temperatures for Leaded and Lead-Free Solder Pastes
The first and second zones in every oven provide uniform preheating.
- For leaded solder pastes, temperatures reach up to 150–160°C.
- For lead-free pastes — up to 170–180°C.
The total time through zones 1 and 2 is about 120 seconds. You’ll see this information summarized in the comparison table on screen.
- For leaded solder pastes, temperatures reach up to 150–160°C.
- For lead-free pastes — up to 170–180°C.
The total time through zones 1 and 2 is about 120 seconds. You’ll see this information summarized in the comparison table on screen.
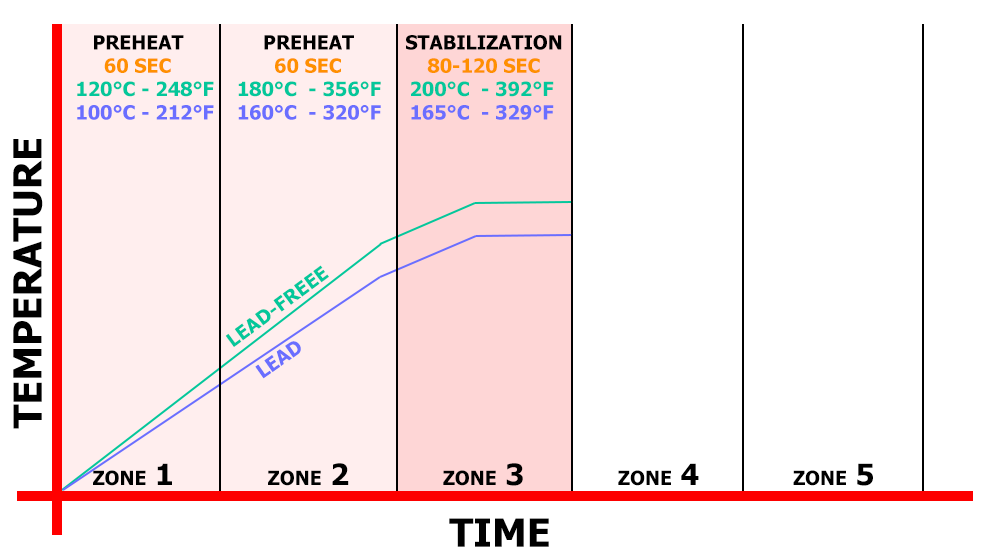
Stabilization Zone – Flux Activation and Thermal Equalization
In this zone, all components — small and large and PCBs — must reach the same temperature - about 165°C for leaded pastes and 200°C for lead-free.
Recommended time for third zone from 80 to 120 seconds. This is also where soldering flux activation occurs.
Flux activation is a chemical process where salts and activators in the solder paste remove oxides from pad surfaces and component leads. This reaction happens within a specific temperature range — right here in the third zone.
The activity level of the flux is defined by its classification:
ROL0, ROM0, ROH0 — meaning low, medium, or high activity. The stronger the flux, the more oxide it can remove — but the more aggressive its residues. If you’re using old or oxidized components, a low-activity flux ROL0 might not be enough. In that case, you may need to use a more active flux ROM0 or is it better to buy new components and pcbs.
⚠️ Important: PCBs soldered with medium- and high-activity fluxes must be properly cleaned after reflow, otherwise residues can cause corrosion. I’ve made a separate video about flux residue and corrosion.
The goal of the third/stabilisation zone is thermal equalization. Even large components and inner copper polygons must reach uniform temperature — around 165°C for leaded, and 200°C for lead-free pastes. At this point, solder paste has not yet melted. This allows time to remove oxide layers, ensuring good wetting and metal bonding between the solder and pcb pads. Leaded soldering pastes like Sn63/Pb37 start melting at 183°C — they are eutectic, meaning a sharp melting point. Lead-free soldering pastes like SAC305 start melting from 217°C and go through a transition range called the mushy zone — typically 4°C wide. This zone is critical! It’s better to give the stabilisation zone a bit more time than to rush into reflow with uneven heating. In high-volume production, these timings are of course finely tuned and optimized. But always check the solder paste datasheet — especially the exact melting range. That’s key to setting up your oven.
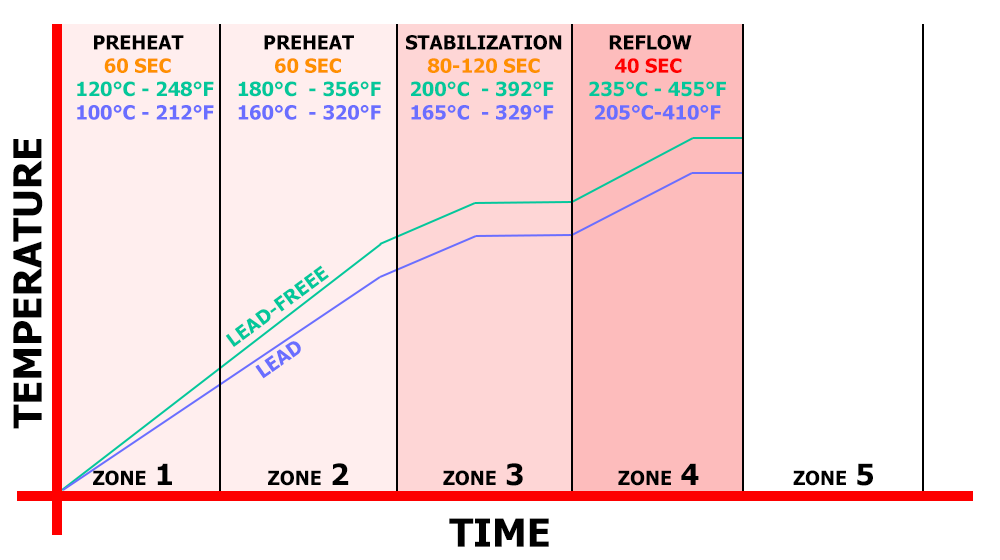
Reflow Zone – Proper Melting and Soldering Issues to Avoid
In this zone, the solder paste must start melting all at once across the PCB.
Typical air temperature in this zone:
- 205–210°C for leaded soldering pastes.
- 235–245°C for lead-free soldering pastes.
Recommended time for 4 zone around 40 seconds.
Here’s a common issue:
If the board moved too quickly through the previous zone, thermal stabilization might not be complete. Large components may not have fully heated up. So when the board enters reflow zone 4, these components will continue absorbing heat from the surrounding area. As a result, solder around them may fail to reflow on time, causing cold joints and component misalignment.
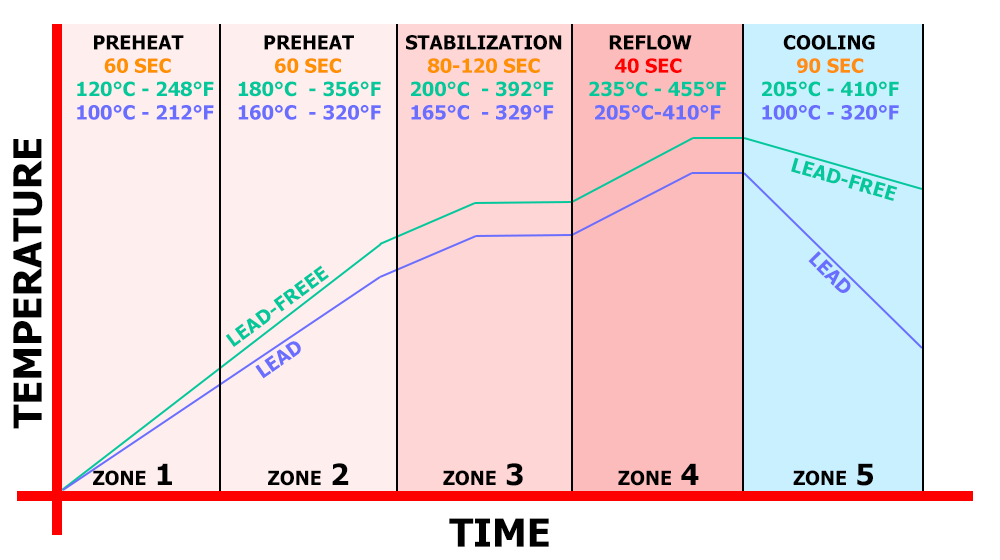
Cooling PCBs Zone – Safe Solidification and Avoiding Microcracks
Modern ovens have a dedicated zone for cooling pcbs. But older or cheaper models may rely on simple fans at the exit, rapidly cooling the board below the melting point. This quick-cooling approach may work for leaded solder pastes, but it’s not acceptable for lead-free solder pastes.
Why? - Because lead-free alloys must pass through the mushy zone — the solidification range around 217°C — very slowly and smoothly.
If this cooling is too fast for lead-free soldering pastes, it may create microcracks or voids inside joints. That severely affects the long-term reliability of the assembly. That’s why many reflow ovens have 2 or even 3 cooling zones, to allow for gradual shrinkage of solder joints.
The goal is to gently pass through the mushy zone. The exact solidification point may vary slightly depending on the soldering paste formula. Also, the time in each zone may differ from the number of zones. Modern reflow ovens have even twelve zones, but their essence is the same. The increase in the number of zones is made for a smoother adjustment of the main processes of preheating, temperature stabilization zone, reflow zone and cooling zone.
Reflow Zone Timings – Summary for Each Zone in Reflow Profile
Each zone has different timing, depending on PCB design, component mass, and solder paste type:
• Zone 1 — Preheating, 60 seconds, maximum 3°C per second.
• Zone 2 — Preheating, 60 seconds, maximum 3C° per second.
• Zone 3 — Stabilization and Flux activation. From 80 to 120 seconds 3°C per second.
• Zone 4 — Reflow. From 30 to 40 seconds, but no more than 60 seconds. Speed 3°C per second.
• Zone 5 — Cooling. A smooth transition through 217°C for Lead-Free soldering paste must be carried out with a cooling rate of up to 4° per second to avoid thermal shock.
I would like to remind you that every time after setting up the reflow oven profile in software, it is necessary to check the actual temperatures inside reflow oven using a thermal profiler device.
Thank you for reading!
Watch video about Reflow Profile for Soldering Electronics!