


Soldering Paste for Electronics PCBs
Author: Khramtsov DmitriiPosted: 2 April 2025
Updated: 2 April 2025

Introduction
Hello! My name is Dmitrii. In this article, about the different types of pastes and the flux inside them.
1 – What solder alloys exist and which one to choose?
Solder pastes can be leaded or lead-free, low-temperature, high-temperature, and also exotic alloys. Most of the time, the choice of solder paste depends on the customer’s process specification. The most common alloys are standard leaded and lead-free types.
When selecting solder paste for your PCB, you should ask yourself the following:
First question – What alloy is used in the BGA balls?
This is the most critical question. If the BGA balls are lead-free, like SAC305, then your paste should also be lead-free.
I know hybrid soldering is possible using two different soldering alloys, but the best solder joint quality is achieved when both the BGA balls and the paste use the same reflow profile. The reason is simple — melting point difference. A 20–30°C (70-90°F) gap can be critical. When using a leaded paste under a lead-free profile with a peak of 250°C (480°F), the leaded alloy will melt earlier and may cause boiling and splattering.
By the way, the melting temperature in reflow oven for lead solder paste is a maximum of 210°C (410°F), and for lead-free solders 250°C (480°F).
Second question – What is the surface finish of your PCBs?
It’s again about different alloys, but the immersion layer is usually thin, and won’t significantly affect the reflow process.
2 – Soldering Flux inside the Solder paste.
Flux in solder paste is classified according to international standards. I’ll leave a link in the video description to a helpful video on flux classifications. There are 18 different types of flux that can be used in electronics manufacturing. Your choice depends on the process speed and the condition of your PCBs and components. In most cases, ROL0 flux is used for standard conveyor soldering.
Another key question — Do you clean your PCBs after soldering or not?
This directly affects the choice of flux — whether it's in solder paste, syringe, or liquid form.
Active fluxes require mandatory cleaning. No-clean fluxes and can stay on the board. In my opinion, cleaning PCBs is always the best practice, except in the case of very low-cost electronics.
3 – Choosing solder paste based on the process.
The solder paste, its flux, and powder type must all match the process specification provided by the customer.
For example, the customer may require a leaded or lead-free process.
But you, as the manufacturer, must still verify this. Check the components, check the surface finish. Make sure their requirements match the actual parts and technology. If you follow their instructions blindly, it may ruin the job and lead to disagreement.
4 – Solder paste types and powder size.
Solder paste contains spherical powder particles — small metal balls. Each paste type has a specific range of particle diameters.
You must choose the type based on:
• the component size.
• and the aperture geometry in the stencil.
The table shows you which solder paste type is approximately suitable for your components. The analysis applies to the smallest components on your PCB.
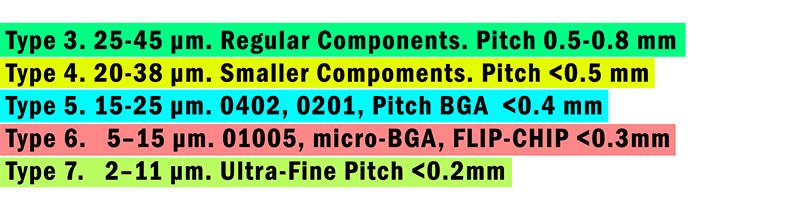
The higher the type of number, the smaller the particles.
The lower the type of number, the larger the particles.
It’s simple: smaller components = smaller particles = higher paste type.
For 0201, you should use at least Type 5.
Type 3. 25–45 µm. Standard components, pitch 0.5–0.8 mm.
Type 4. 20–38 µm. Smaller components, pitch less 0.5 mm.
Type 5. 15–25 µm. 0402, 0201, fine-pitch BGA.
Type 6. 5–15 µm. micro-BGA, CSP, 01005.
Type 7. 2–11 µm. ultra-fine pitch, high-density.
Type 8. 2–8 µm. ultra-fine pitch, 01005, high-density.
Why is this important?
Larger particles can get stuck in the stencil apertures.
There are two ways to determine which type of paste you need:
Method 1: The “5-ball rule”
Stencil aperture and the 5-ball rule in solder paste printing.
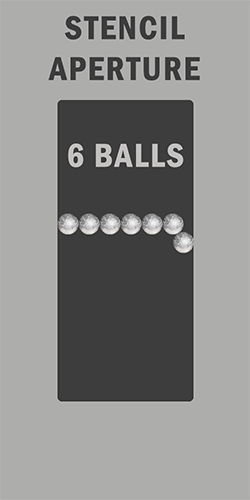
Print solder paste through the smallest aperture and inspect solder paste print in PCB under a microscope. Count how many powder balls fit across the pad.
• If you see 5 or more balls — that’s good.
• If it’s only 3 or 4 — you need a higher paste type.
• Smaller particle or ball size = better release, but higher types cost more.
Example: You use Type 3. You see 4 balls across the smallest pad — that’s too few. The paste may get stuck in the stencil or leave a weak print.
Method 2: Calculation based on aperture size.
Ask your designer for the smallest aperture width in the stencil. Then divide by average ball size.
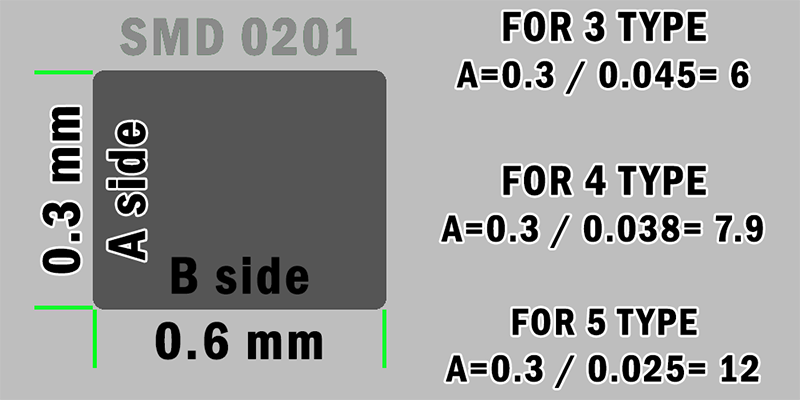
Example:
Solder Paste Types for 0.3 mm (11.8 mil) Pad Diameter:
• Type 3 — Avg Particle Size: 35 µm → ~8.6 balls across the width of the pad.
• Type 4 — Avg Particle Size: 29 µm → ~10.3 balls across the width of the pad.
• Type 5 — Avg Particle Size: 20 µm → ~15 balls across the width of the pad.
• Type 6 — Avg Particle Size: 10 µm → ~30 balls across the width of the pad.
• Type 7 — Avg Particle Size: 6.5 µm → ~46 balls across the width of the pad.
Both methods can work — but more balls = better paste release.
You must choose the type based on:
• the component size.
• and the aperture geometry in the stencil.
The table shows you which solder paste type is approximately suitable for your components. The analysis applies to the smallest components on your PCB.
The higher the type of number, the smaller the particles.
The lower the type of number, the larger the particles.
It’s simple: smaller components = smaller particles = higher paste type.
For 0201, you should use at least Type 5.
Type 3. 25–45 µm. Standard components, pitch 0.5–0.8 mm.
Type 4. 20–38 µm. Smaller components, pitch less 0.5 mm.
Type 5. 15–25 µm. 0402, 0201, fine-pitch BGA.
Type 6. 5–15 µm. micro-BGA, CSP, 01005.
Type 7. 2–11 µm. ultra-fine pitch, high-density.
Type 8. 2–8 µm. ultra-fine pitch, 01005, high-density.
Why is this important?
Larger particles can get stuck in the stencil apertures.
There are two ways to determine which type of paste you need:
Method 1: The “5-ball rule”
Stencil aperture and the 5-ball rule in solder paste printing.
Print solder paste through the smallest aperture and inspect solder paste print in PCB under a microscope. Count how many powder balls fit across the pad.
• If you see 5 or more balls — that’s good.
• If it’s only 3 or 4 — you need a higher paste type.
• Smaller particle or ball size = better release, but higher types cost more.
Example: You use Type 3. You see 4 balls across the smallest pad — that’s too few. The paste may get stuck in the stencil or leave a weak print.
Method 2: Calculation based on aperture size.
Ask your designer for the smallest aperture width in the stencil. Then divide by average ball size.
Example:
Solder Paste Types for 0.3 mm (11.8 mil) Pad Diameter:
• Type 3 — Avg Particle Size: 35 µm → ~8.6 balls across the width of the pad.
• Type 4 — Avg Particle Size: 29 µm → ~10.3 balls across the width of the pad.
• Type 5 — Avg Particle Size: 20 µm → ~15 balls across the width of the pad.
• Type 6 — Avg Particle Size: 10 µm → ~30 balls across the width of the pad.
• Type 7 — Avg Particle Size: 6.5 µm → ~46 balls across the width of the pad.
Both methods can work — but more balls = better paste release.
5 – Storage conditions for solder paste.
Always store solder paste in a refrigerator — not in the freezer. Before using, the solder paste must be mixed. If you use a mixer — great! It also warms the paste. If not — take the paste out of the refrigerator 4 hours in advance, let it warm up, then open and mix it manually.
6 – Conditions for quality stencil printing.
• Use a high-quality stencil.
• Choose the correct paste type.
• Mix solder paste properly.
• Room temperature: ~20°C (68°F).
• Humidity: ~50%.
• Use flat, undamaged squeegee blades.
• Never use expired paste.
7 - What’s written on solder paste jars?
Good marking:
• Alloy is clearly shown, Ball size shown — for example 25–45 µm, Flux type written — like ROL0, Paste type marked — T3, T4, T5, etc., Expired date shown.
Bad marking:
• No alloy listed, No particle size, No paste type, No flux class, No expiration date.
Words like No Clean may mean anything — or nothing.
Exact flux classification is important — especially if boards will be washed after soldering. Same for labels like Lead-Free or Pb-Free. There are many lead-free alloys, and it’s critical to know which one is used.
If you need water-soluble paste, it must say it clearly with flux class.
You will not understand what activity the flux in the paste has. You need an exact class, for example ORL0, ORM1, ORH1. All these are water-washable fluxes, but with different activity. Poor cleaning of active flux can cause oxidation or corrosion.
8 - Stencil quality.
Never save money on stencil quality. The edges and corners of the aperture are very important for smooth paste release.
Polished or electro-polished stencils are strongly recommended, especially for 0201 and high-type solder pastes. Use IPC-7525 standard "Stencil Design Guidelines for control and design stencils".
Polished or electro-polished stencils are strongly recommended, especially for 0201 and high-type solder pastes. Use IPC-7525 standard "Stencil Design Guidelines for control and design stencils".
9 - Mistake when choosing solder paste.
Many manufactories pick paste “by habit” — for example, using Type 3 for everything. This can cause problems: bridging, poor prints, weak solder joints. Some blame the printer, but the real problem is the powder type.
10 - Solder Paste Viscosity Types.
Type H 800–1200+ Pa·s. High viscosity Thick paste. Good for hot rooms or when the paste must hold its shape longer. Often used for manual printing or with dispensers.
Type M 500–800 Pa·s. Medium viscosity. The most common type for stencil printing. Balanced flow and shape retention.
Type L 200–500 Pa·s. Low viscosity. Flows easily. Used for fine-pitch components, small apertures, or cool, controlled environments.
Viscosity is important, but it’s a secondary parameter. It affects how long the paste can stay open on the board before reflow.
If you print at the end of your shift and leave the boards for later, store them in the fridge.
If your room is hot and the temperature cannot be controlled — choose a paste with higher viscosity.
Low-viscosity paste may spread too fast. It can lose shape before reflow.
High-viscosity paste will hold its shape longer. It’s better for warm room temperature.
TIP.
Before starting a new PCBs batch, do a few test prints.
Check under the microscope — are there dry zones, bubbles, bad release.
Different batches of the same solder paste may behave differently.
Check under the microscope — are there dry zones, bubbles, bad release.
Different batches of the same solder paste may behave differently.
Summary – What matters when choosing solder paste?
1. Choose the right solder alloy.
2. Choose the correct flux type — or follow your customer's spec, but always verify it.
3. Choose the right powder size, paste type.
4. Choose the correct Viscosity.
2. Choose the correct flux type — or follow your customer's spec, but always verify it.
3. Choose the right powder size, paste type.
4. Choose the correct Viscosity.
Just in case, additional article about SOLDER PASTE VISCOSITY
Thank you for reading!
Watch video about Tombstone Effect / Defect in Electronics